There’s no disputing the utility of canister filters, but what happens after you’ve run them for a while and they start becoming dirty? Debris starts to accumulate; your filter gets gunk in all the wrong places, and (in addition to losing effectiveness) it becomes unsightly. To top it all off, it’s not as if the instructions that came with your unit are all that clear on how you’re supposed to clean everything out.
The filter hoses, in particular, can be a bear – they’re long and often curled or tangled. How do you get anything in there that’s going to clean the entire length of the tube? What do you stick into the tube that’s tough enough to clean but gentle enough not to puncture it? It’s tricky stuff, and while you might not be able to depend on that instruction leaflet, I’ve taken the time to assemble everything you need to know about how to clean canister filter hoses.
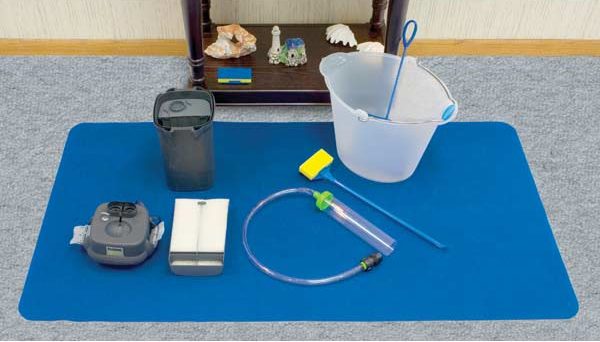
You’re going to need a few things to get started. Unfortunately, except for the dirty hoses, not many of them come packaged with your filter. We’re going to have to find something to insert into the tube, and a proper place to wash out that gunk along with a few other items.
What You Will Need to Get Started

- Dirty Hoses
- Bucket or Basin
- Warm Water
- Hose Brush
- Rubber Gloves
- Towels
- Teflon Tape
- Hydrogen peroxide or vinegar
Possible Substitutions/Additions
Heavy Duty Tank Gloves
Rubber gloves are generally enough to keep your hands dry and free from dirt and grime while you’re cleaning, but can sometimes tear. If you’re worried about traditional rubber gloves ripping on you, you can substitute with heavy duty aquarium gloves for extra protection. They are made from PVC, so they’ll handle a lot more abuse, and include fiber-reinforced sleeves that cover your arm up to the elbow.
Cleaning Mat
Towels are an adequate solution as far as work surfaces go. They’ll keep water off your floors to a point, but could get oversaturated and start leaking. Also, we’re also dealing with muck. If it cakes up on your towels while cleaning, you’re going to have to run the wash for them. An alternative would be an aquarium cleaning mat, which is highly absorbent, has a waterproof back that prevents water from spilling onto the floor, and can be easily cleaned under the sink.
Magnetic Tubing Cleaner
Inserting a brush attached to a wire does seem a bit old school and if you’re looking for a more advanced way to remove buildup from your tubes, you could also try a magnetic tube cleaner. It removes buildup mechanically but reaches spots your brush might not be able to and reduces how wet you get during cleaning.
A Sump Pump
If you’re looking for an even more “hands-off” method for cleaning your pipes, you could forego sticking anything into them altogether, and use a sump pump to force pressurized water through the hoses and clean them. They aren’t terribly expensive, depending on which you elect to get, and it will be a handy thing to have around that you can use for other applications once you are done cleaning the hoses.
Instructions
1. Turn Off Filter/Disconnect The Hoses
This step is simple enough. Turn your intake and output valves to the “closed” position. Then, unplug your pump from its electrical power supply. Depending on your filter, there will be different methods for disconnecting the hoses. Many filters have a lever that you can pull that will simultaneously pop both hoses off. You can then unscrew them from there.
2. Prep Your Cleaning Area
Instead of going straight to cleaning the hoses, you have to do some preparation. To make the hoses easier to work with, and loosen up some of the interior buildups, You’re going to soak our hoses in a basin of warm water for a while. While this is going on, you can also set up our work area. Lay down your towels (or mats), don your cleaning gloves (if you have not done so already) and then head back to check on your hoses. It is now time to start cleaning, and there are three great ways to do so.
3. Method One: Use Your Hose Brush
This method seems straightforward. Stick your hose brush into the tubing at one end, then start scrubbing. Depending on how dirty your tubes have become, it might take a considerable investment of time, and you’ll need to put some muscle into it! There are also a few drawbacks to using your hose brush.
In some cases it might not be long enough to get all the way into the tubing. When you have it completely extended, you’re likely to lose your scrubbing force, resulting in a less effective clean. Furthermore, the pipe the brush is attached to is sometimes flimsy, and you’ll be unable to generate any power for cleaning. Other times it can be too stiff, and may snap unexpectedly.
4. Method Two: Use Your Magnets
This is one of my personal favorite gadgets. A tube magnet cleaning kit consists of a scrubbing surface with an embedded magnet, and a larger magnet that is used to move it. Insert the scrubbing magnet into the hose, then use the powerful magnet on the outside of the hose to move the scrubber back and forth.
This is more convenient and much more thorough than the hose brush. You can run this along the entire length of any pipe, and you won’t have to worry about it getting stuck or breaking. Best of all, no getting your hands wet or dirty! The only problem is that the scrubber is quite small, so this method might take a considerable amount of time.
5. Method Three: Use Your Pump
If you’re feeling savvy and not in the mood for doing any scrubbing, you can harness the power of technology to make this process much easier. Attach a sump pump to your hose, submerge the pump and hose into a solution of water and hydrogen peroxide (vinegar works as well), then turn on your pump. Simplicity at it’s finest. It’ll take about 30 minutes to complete the process, generally speaking, so keep a timer on standby to remind you when time is up.
6. Let Your Hoses Dry
Now that they’re clean, your hoses will need time to dry out. Set them out on your towel or mat, then give them a few hours rest. If you used hydrogen peroxide in your cleaning method, it will go to work bleaching the tubes as they dry, making them look even cleaner. While you’re waiting, you can tend to some other tank or filter maintenance. Perhaps your filter’s impeller needs some declogging? You could get some stains off the sides of your tank, or even touch up your tank water with some additives you’ve been meaning to try.
7. Reconnect Your Hoses/Turn Your Filter Back On
If you remember your filter assembly process, this should be no trouble at all. If not, you may have to refer to some specifics in your filter’s instruction manual. Generally speaking, though, you’ll just be doing the reverse of what you did to disconnect the hoses. If your connections require Teflon tape, make sure you apply some to the threads now. Once you have your hoses back in place, open the valves and re-initiate your filter.
8. Check Your Filter Performance
Now that the hoses are back in place, monitor your filter’s operation for a while after starting it back up. Make sure that your flow level meets or exceeds what it was before you did your cleaning. If things aren’t working right, and you’re certain your hoses are clean, you may need to check the connections of your hoses, make sure that the valves are not blocked, and make sure that your impeller is not blocked or damaged.
Conclusion
How did that go for you? Depending on which method you used, you may or may not be exhausted at the moment! I hope the tutorial was helpful, and able to give you a better understanding of the different methods available for cleaning your filter hoses. They can sometimes be overlooked, but it’s important to keep them from clogging so that your filter’s performance can remain at its peak.
If you have clear hoses, then you’ll definitely want to clean them periodically to keep them from looking unsightly. Which method did you use to clean your hoses out? Did you try more than one and compare? Perhaps you know of another method and want to share? Whatever the case, express yourself! Let me know what you think in the comments.
Having trouble cleaning your filter canister too? Check out this article for easy steps.